Pages

Wednesday, 30 October 2013

Eggplant, Zucchini & Mint salad


This is a great tasting salad that looks good, too. I made it especially for our daughter's visit recently as I wanted something fresh, with some substance but not too filling - Yum!
                                  

This attractive, fresh tasting salad is a feast for the eyes as much as the palate, and makes a delicious accompaniment for polenta dishes or almost anything else you can think of.
Serves 4-6.

1 eggplant (450-500g)
450-500g zucchini
Oil
Salt and pepper to taste
1x 400g tin cannellini beans
½ packed cup roughly torn or chopped mint leaves
Zest and juice of 1 large lemon
¼ cup roughly chopped flat leaf parsley leaves

Pre heat oven to 190 C.
Slice the eggplant into 1cm rounds. Brush both sides with neutral oil or dip into a bowl of oil and wipe off any excess on the lip of the bowl. Place the slices on an oven tray in a single layer. Bake at 190 for about 25 minutes, until golden brown on both sides. Turn once during cooking. Season with salt and freshly ground pepper, and slice the rounds in half.
Slice the zucchini with a potato peeler into long ribbons.  Toss in neutral oil to coat lightly and season with salt and freshly ground pepper. Spread onto a baking tray and bake at 190 C for 5- 7 minutes or until just cooked through, tossing once or twice.  Remove from the hot tray to prevent further cooking and preserve colour.
Place the rinsed and drained beans in a large bowl and toss with the mint, lemon zest and juice.
Gently combine the beans with the roasted eggplant and zucchini, season to taste, and add a little more lemon and mint if wished. Transfer to a serving platter and garnish with the parsley.

Saturday, 10 August 2013

Life's Too Short Marmalade

There are no better gifts than those you make yourself, and I absolutely love giving preserves I make to friends and family; the only exception being this marmalade.
I'm so conflicted about this, but it doesn't give a high yield, (there's no water added, relatively low sugar content) and it's all about real, intense fruit flavour. So I have this overwhelmingly selfish impulse to keep it and not give it away. Very conflicting. 
It's a challenge to cut down sugar content in preserves, but it is perfectly possible to achieve this to let real flavours shine. Most of our commercial producers are missing the point, I believe, and therefore consumers are missing out. It's so easy to make your own pickles, chutneys, relishes, jams and jellies, just choose seasonal to minimise cost, maximise flavour and say no to preservatives and colourings! (You won;t be sorry).

Photo: Think Photography

Life’s Too Short Marmalade

This marmalade is for those who like the best in life, a little more time - consuming in terms of yield, but absolutely worth it. The secret is in the method; flavor is maximized by keeping sugar to a minimum, and no water is added – it’s just fruit flesh, zest, and a minimum of sugar to preserve and enhance the flavours. You simply can’t buy marmalade as good as this unless expense doesn’t matter.
The flavours here are bold and intensely orange, but balanced by the lime to create a particularly delicious spread.
Use all oranges for this marmalade if you prefer, or experiment with other citrus.
Makes 2 x 350g jars.

1 kg thin skinned oranges
250g limes (3-4, depending on size)
500g sugar
2 Tbsp peeled and finely chopped fresh ginger (optional)

Using a zester,* preferably, or a floating blade peeler, remove the zest from all the fruit, ensuring that none of the pith is attached. Roughly chop the long strips of zest if a zester has been used. or finely slice the peeled zest into fine julienne lengths, and chop roughly. Transfer to a large saucepan.
With a sharp knife, pare the pith from all the fruit and discard.
Dice the fruits small, about 5mm (¼ inch), discarding any core or obvious membrane. Try not to lose any juice.
Transfer the diced fruit and juice to the saucepan with the zest, stir in the sugar and bring to simmer point.
Simmer, uncovered, for 25 - 30 minutes, stirring regularly. 
 Test by placing ½ teaspoon of the marmalade on a saucer to cool then nudging with a finger. If the surface ripples, it is ready to pour into hot sterilized jars and cover with sterilized metal screw on lids.

*A zester has a truncated ‘blade’ with 6 small holes.

Sunday, 4 August 2013

Sophisticated Organics and Sustainability


Although I moan about the growth in suburb sprawl at the expense of how uncomplicated life used to be in Wanaka, one positive is that the population is growing ever more diverse; representing every facet of the social strata and bringing new skills and experience into the district. Which brings me to the point of this post; on my last visit I had the luck to be introduced to a couple who are well into a fascinating and ambitious lifestyle project, making their lives as ecologically sustainable as possible - and part of this is to grow as much food as they can themselves, organically. Their determination and the sophistication of this endeavour is not only impressive, it's nothing short of inspirational. The focus is uncompromisingly on recycling resources and sustainability, wasting as little as possible and eating as healthily as possible

Randolf and Marty in front of their asparagus bed
We've unwittingly walked past their property many times and commented on what looked like a 'serious' garden from the street - but as it turns out, we didn't know the half of it.

Randolf and his 'tunnel houses'

This is what we'd glimpsed from the street; long, carefully nurtured, boxed vege gardens. In fact, each of these long rows are partitioned into 1.5 metre square plots, which Randolf has graphed on his computer so that he and Marty know exactly what is grown in a particular plot each year, how much yield is realised and what beds need crop rotation. Not only that, but beneath these beds run water filled copper pipes capturing residual warmth from the soil and conveying it to their home's heating system so it doesn't have to operate from zero temperatures (of course solar power is accessed also).


Some of the beds grow herbs and vegetables solely to feed the rabbits farmed to supplement this couple's meat sources; next year they intend to set up a snail farm to further supplement and add variety (if you can't imagine this, have a look at my August 2011 post, 'The Upper Nivernais Canal - by boat'. I've posted photos of a snail farm we visited in Burgundy -we plan a return visit in about a month).

There's simply too much to comprehend about this 3/4 acre garden - 85 fruit and nut trees, many espaliered around the periphery; pears, apples, plums, nectarines, cherries, fig and citrus, 55 of which are apples, cider apples and crab apples. An underground 'root cellar' keeps pumpkins and home pressed apple cider (12% alcohol) at a controlled temperature and the green house's temperature is controlled by - yes - a geothermal field. Lemons, chillies, herbs and the more tender vegetables thrive here, oblivious to any temperature extremes outside.
In the house, one large room is devoted to weighing, drying and preserving what the garden provides.


. 

Hens not only provide eggs but have access to large compost bins, which they happily pick through, depositing manure as they go; this is in turn distributed to the gardens, as is the rabbit manure.
Oh - and let's not forget the two beehives that produce about 50 litres!! of honey per annum.

Randolf and Marty's passion, vision and philosophy are the drivers of this carefully conceived operation, but they also intend to involve and benefit others from it. Their plan is to invite those who don't or can't grow their own to help with maintenance and harvesting, in return for a share of the produce - a fabulous idea, and I'm already scheming in the hope I can get invited to the apple cider pressing next year!

We return to Wanaka each year to recharge and catch up with cousins and friends; I've been visiting all my life and husband Russ was born just around the corner (well sort of) in Kingston. Despite Wanaka's growth we still love it and the whole area - we tramp, fish, bike, walk, swim and do lots of socialising. I even rode on a cavalcade not so long ago and had, literally, one of the best weeks of my life. 

Wednesday, 19 June 2013

Of Lemons and Snow

Blogging hasn't been on my mind over the last 6 weeks; that's what a family crisis will do to you, on top of which I'm at the other end of the country and away from home, work and routines - just saying. . .
Before I left home, however, I picked lemons and preserved them as I find them so useful for so many dishes - soups, finely chopped into dips, sauces, lots of different rice dishes, couscous, lentils, pizza seafood toppings, tagines etc. They're also really good sliced, with or without the preserved flesh, on fresh ciabatta with baby watercress, drizzled with extra virgin olive oil.

I make three different kinds of preserved lemons and limes, and use them all as and when the mood takes me - traditional pickled lemons which are very salty, but of course when finely chopped and cooked, the salt and lemon flavours just infuse into the dish. I especially enjoyed adding finely chopped lemon ( rind and flesh) to a tomato sauce with fish recently. Sometimes I just use the rind and discard the flesh, other times I use both, depending on the dish. At the beginning of the season I use a quick method because I'm an impatient type and I've either given my stock away or used them all - then I make a slower maturing method to enjoy and keep for the year (we can live in hope).

Traditional (salty) preserved lemons
The latter two methods I find slightly more useful  - sugar gives them more versatility, especially for adding to dips, for example, or just for dipping into for a nibble.

                                                         Preserved Limes (or Lemons)

Sealing the jars is not strictly necessary, as these preserves keep well, for at least a year.
Makes 1 x litre jar, or 2 x 500g jars.

10-12 limes, depending on size
5 Tbsp rock salt (not fine)
6cm ginger, peeled and sliced
6-8 dried red chillies (optional)
1½ cups sugar
1 cup white vinegar

Wash the limes and slice each into six, lengthways. Cover the bottoms of two sterilized 500g jars or one 1 x litre jar. The jars don’t need to be hot but should be warm, as hot syrup will be poured into them when packed.
Sprinkle over 1 tsp of the rock salt and repeat the layer of lime slices and salt, distributing the chillies and ginger between the layers.
Heat the white vinegar and the sugar in a saucepan and simmer 3-5 minutes, uncovered. Stir regularly.
Pour the syrup over the limes and screw on a hot sterilised lid (s) or clip-lid jars.

Leave at room temperature for 4 weeks, then store in a cool dark place  - in this way they will keep for at least a year and should not need refrigerating. Basically, operate on the assumption that the longer they are kept, the better they will be. 

While I'm at it, it's quite uplifting to be thinking of lemons while there's snow outside . . .exciting!

Early morning Lake Hawea, June 20th, 2013


Saturday, 20 April 2013

Harvest chutneys - Eggplants and Feijoas

When I had four young children and was working from home, I found myself spending at least 3-4 months a year making chutneys, pickles and relishes. This became something of an institution in our house, as I realised I could transform anything, from tasty cheddar on biscuits to a sausage (our three boys like vegetarian meals but also enjoy meat) by adding a great chutney, pickle or relish without costing much at all. School lunches were coveted by other kids and I didn't have to spend my life baking to have something to offer visitors - crackers and cheese with a home -made chutney was appreciated so much more. Best of all, even the humblest meal in our house was never boring, despite the financial constraints; there was always a jar of something to add interest, texture and flavour. I enjoyed the creative challenge of pushing boundaries, adding new flavours or testing new products, and I still do.

Eggplants are so versatile, and I make lots of different dishes with them; risotto, fritters, lasagne, moussaka, pies, pasta and dips, to mention just a few. I also make a very authentic Indian pickle that is not as sweet as the brinjal below, just as delicious though completely different.

About ten years ago, after lots of trials, I developed a brinjal (eggplant) chutney, and this became my most universally popular chutney ever. Everyone loves it ; I even have a friend who numbers every jar because her husband and son are so proud they sneak jars to give to their friends behind her back! Certainly it's top of the request list from my friends and family, and although time is running out I bought a big bag of eggplants for $4.00 at our local Farmer's market last Sunday, to make another double batch.


                                             Brinjal                     
     
This eggplant chutney literally took years to perfect, but is universally popular. Sweet but piquant, it complements curries, cheeses, pastries and just about anything.
Makes about 2 ½ litres.
Use processed garlic and ginger to save time.

2 large eggplant, about 500g each
4 tsp salt
¼ cup tamarind concentrate*
1 cup oil
¼ cup mustard seed (I use yellow)
100g crushed garlic
100g minced ginger
2 Tbsp fenugreek seed
2 Tbsp coriander seed
2 Tbsp cumin seed
1 Tbsp chilli powder
3 x 410g tins peeled tomatoes in juice, chopped
1 cup malt vinegar
1 kg sugar

Slice the unpeeled eggplant into small (¼ inch –5mm) dice. Place in a colander, sprinkled evenly or tossed with the salt. Set aside over a sink or bowl to drain for 30 minutes.
Meanwhile, prepare the remaining ingredients.
Heat the oil in a large, heavy based pot or jam pan, over a medium high heat. Add the mustard seeds and heat until they start to pop. Remove from the heat and stir in the fenugreek, coriander and cumin seeds followed by the garlic, ginger and chilli powder. Return to a lowered heat and cook, stirring, for about 4 minutes. Stir in the salted and drained eggplant without rinsing or patting dry – just shake the colander before adding the eggplant, then sauté for 3-4 minutes.
Stir in the chopped tomatoes with juice, ¼ cup of tamarind pulp, vinegar and the sugar.
Simmer the mixture, uncovered, for about 1½ hours, stirring occasionally. Oil should rise to the surface after about an hour, and further cooking produces a medium-thick chutney, reduced to almost half the original volume.
Bottle in hot, sterilized jars with hot, sterilized screw on lids. 
*Take 125g from a block of tamarind pulp, available from any Asian food store. Break it up and soak in one cup of hot water for 15 minutes, breaking it up further as it soaks. Push it through a sieve and discard leftover fibre and seeds. Measure out the amount required and freeze the excess for future use.
An acceptable substitute to making your own concentrate is tamarind paste, available from Asian outlets (especially the Pantai norasingh brand).  


And this week, the feijoas started falling


And I do mean by the trailor load! However, another favourite chutney is . .

Smoke & Lime Feijoa Chutney
Both recipes will be in my new cookbook, 'Rowan Bishop- with Relish ' due for release early October.
After the feijoas come figs and persimmons, and in between are limes and lemons to preserve. . .

Sunday, 17 March 2013

This kitchen is smoking!

Working towards this new book is consuming my life! I either forget to take photos of whatever I've concocted, or I have no time to deal to this blog as I'm too busy writing up and moving on. . .
No time to  moan though, so I'll just post photos of some of the things I've been experimenting with over the last 3 months, then if any one wants a recipe or to know more, leave a message. . .

First, one of my blokey foodie friends provided the inspiration for these fantastic home smoked mussels. I am so into our wonderful farmed green lip mussels - readily available, sustainable, delicious, nutritious (not only low in fat but contain as much iron as red meats) and a great source of protein that is cheap! I bought quite a few kilos last week at our local supermarket when they were $1.99 kg; for mussel soup, mussel pie and these little beauties

All you need is  home smoker (a must for any home, I say. . .)
The mussels were marinated overnight in sweet chilli sauce and kecap manis, and they were fabulous - as were the smoked tomatoes, too. You can't over-smoke tomatoes, as more is less with them, but I think I've got the timing right now. I was so pleased I took about 15 of the mussels to a friend's place mid afternoon and she seriously ate almost all of them - well, they all disappeared and I only got two, so there's no other explanation.

Next up is artichoke heart salad, made for lovely friend Faith's 60th birthday this last weekend - I sauteed garlic and a few mashed anchovies in virgin olive oil, then added lemon juice and zest, plus seasonings of course for the dressing. The salad had marinated, well drained artichoke hearts (no, I didn't cook them myself, my garden has been a wasteland this year!), cannelini beans, flat leaf parsley, chives, black olives, diced celery and sliced bocconcini  - you could use ricotta or even creamy feta for a different take on this. I eavesdropped on a few comments at the party, and it seems that everyone thought it was pretty impressive -and delicious - so a wee pat on the back there, as well as a sigh of relief.


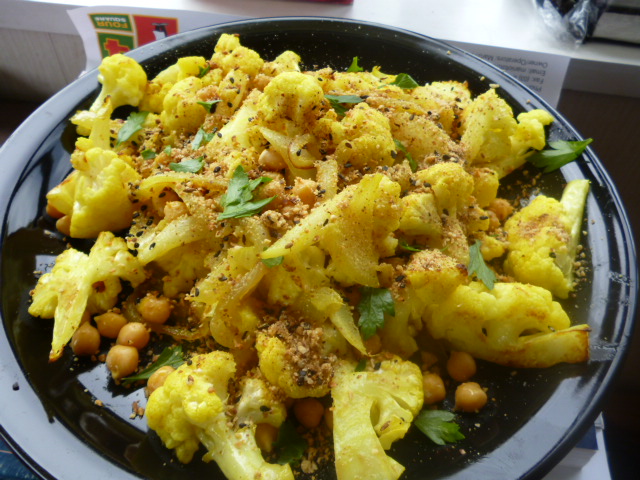
I've also been working on a roasted cauliflower salad with chickpeas & dukkah (home made of course!) and am happy to say it's been a success too

Roasted cauliflower salad with chickpeas & dukkah
- unlike my anchovy dip. I'm going to have to put that aside for a while, let ideas percolate and maybe come back to it.

Fried curry leaves for Indian-inspired soup garnishes


and a cauliflower soup with corn, basil and blue cheese - it's weird how these flavours work so harmoniously in this soup, I love it when that happens!

Cauliflower soup with corn, basil and blue cheese

And I'm going to bore you all if I add any more to this post, so I'll have to leave the pitas and rice paper roll banquet til next post. Meanwhile I'm heading to the kitchen to create the best squid ink spaghetti I've made yet (hopefully) and a Thai vegetarian noodle salad.

Sunday, 10 March 2013

The thing about salads. .farro and quinoa

It's been such an amazing, never ending summer this year that salads are even more of a feature in our family  meals than usual; so versatile, and only limited by your imagination - a far cry from when a salad meant shredded lettuce with sliced tomato and hard boiled egg on top, served with a condensed milk dressing. It's not that I'm being sniffy, it's just that variety really does matter, and our whole concept of salads has changed in the last couple of decades. Now a salad can mean a main meal or a side, it can be a noodle based dish, contain meats or not, be served hot, at room temperature or even chilled.

 I love exploring different grains in salads, as well as pulses, using them in all kinds of innovative ways - incorporating vegetables, nuts, herbs, fresh and dried fruits, and cheeses too. Dressings are so important, and of course there are some wonderful new products to build dressings on, such as Tart Apple syrup from Tauranga, pomegranate molasses, lovely vinegars and stunning oils.

I have written about farro in one of my earlier blogs, when we were living in Tuscany for a few months; it's a deliciously nutty, chewy, ancient wheat grain that Italians have eaten for centuries, but one we don't know particularly well in New Zealand. It is quite similar in taste and texture to barley, actually, just a bit nuttier and chewier; both can be used in risottos, to thicken stews and of course in salads.

In any case, supermarkets in Tuscany had quite a number of different varieties of farro, most of which had wildly different cooking times; I finally realised, however, that farro perlato was the one most people bought, and that's the one most readily available here; the cooking time is a comfortable 20 minutes approximately.

My photos never look as good as the subjects do in real life!


Farro is well worth trying, with more protein and B vitamins than most grains, an interesting texture and the nutty flavour complements almost anything. I've tried it mostly as a salad, with various combinations of these components; fresh mozzarella, capers, sun dried tomatoes or roasted red peppers, olives, capers, parsley, mint, lemon or lime juice, roasted fresh corn kernels, caramelised onions, toasted almonds. Basically, it's like working with pulses - my mantra is, lighten these base ingredients with lots of flavourful, textured other ingredients, they shouldn't weigh the dish down.

Another salad that 's been really popular over the summer is my black quinoa tabouleh; it looks so gorgeous with the green parsley and black quinoa but can also be made with either burghul or couscous - now that quinoa is so popular, it's not a bad idea to use an alternative so that the traditional quinoa growers can keep some for themselves rather than exporting it all. I'm wondering if some inventive folk might come up with a way to harvest and process fathen (fat-hen, a close relative of quinoa) - wouldn't that be a great ugly duckling story, transforming a pesky weed into a great food source!

BURGHUL, COUSCOUS OR QUINOA TABOULEH
  Tabouleh (Tabouli) is a salad to return to, especially in summer. It’s worth trying it with couscous or cooked quinoa, however, for a different result than with the more familiar burghul. (One cup raw quinoa produces three cups of cooked, whereas the other two grains produce two cups of soaked grain for one raw). Black quinoa makes a very attractive tabouleh.
Serves 4-6

1 cup burghul or couscous
                        or 2/3 cup black or white quinoa
2 cups finely chopped parsley leaves
1/3 cup finely chopped mint leaves
3 spring onions, chopped finely
¼ cup lemon juice
¼ cup olive oil
1 tsp salt
freshly ground black pepper
3 firm tomatoes, seeded and diced

Cover the burghul with cold water and leave for 30 minutes. If using couscous, cover with boiling water and stand for 7 minutes. For quinoa, cook in 2 cups salted water, uncovered, for 15-20 minutes until the ‘curl’ is released and the grain is al dente before refreshing under cold water.
 Drain thoroughly in a sieve, lightly pressing to remove all liquid.
Transfer to a serving bowl and add the parsley, mint and spring onions.
Stir in the lemon juice, oil and seasonings. Discard seeds and juice from the tomatoes, dice the flesh   and stir into the tabouleh.